# Ubuntu 建置 Django 開發作業環境指引
# 摘要
在 VirtualBox VM 執行安裝作業,使 VM 成為 Django App 之「作業平台」。
- 安裝開發作業基礎工具
- 安裝 Node.js 作業環境
- 安裝 Python 作業環境
- 安裝編輯器
- 安裝 nginx 服務
- 安裝 Django App 原始碼
- 安裝 uWSGI 服務
# 安裝開發作業基礎工具
- 安裝 git 版本管理套件。
sudo apt install git
- 安裝檔案下載工具。
sudo apt install curl
# 安裝 Node.js 作業環境
# 安裝 node 與 npm 套件
- 安裝 n 套件管理器
cd
curl -L https://git.io/n-install | bash
2
或
brew install n
- 在 Bash Shell 設定檔,設定 PATH 環境變數。
🔖 ~/.bashrc
#export N_PREFIX="$HOME/n"; [[ :$PATH: == *":$N_PREFIX/bin:"* ]] || PATH+=":$N_PREFIX/bin"  # Added by n-install (see http://git.io/n-install-repo).
export N_PREFIX="$HOME/n";
export PATH="$N_PREFIX/bin:$PATH"
2
3
- 重啟 Bash Shell 。
source ~/.bashrc
- 透過 n 套件管理器,安裝 node 與 npm 套件。
- 最新版
n latest
- 最近 LTS 版
n lts
# 安裝套件管理器:yarn
npm 本身即是 Node 之「套件管理器」。何以要再安裝 yarn ,主要原因是有些套件的安裝 偏好使用 yarn 所致。
- 安裝
sudo npm i -g yarn
- 驗證
yarn 安裝位置: /usr/local/bin/yarn
which yarn
# 安裝 Python 作業環境
# Ubuntu Python 特性
- Ubuntu 20.04 作業系統,預設安裝 Python 3.8.5 ;但無 Python 2.X 。
作業系統預設的安裝目錄路徑:/usr/bin/ 。
📺 使用指令 python, pyton3 觀察作業系統的預設:
alanjui@MBP2018:~$ ssh 192.168.66.220
Welcome to Ubuntu 20.04.2 LTS (GNU/Linux 5.8.0-48-generic x86_64)

 * Documentation:  https://help.ubuntu.com
 * Management:     https://landscape.canonical.com
 * Support:        https://ubuntu.com/advantage

現在可以安裝 0 項更新。
其中有 0 項更新為安全性更新。

Your Hardware Enablement Stack (HWE) is supported until April 2025.
Last login: Sat Apr  3 11:28:46 2021 from 192.168.66.21
alanjui@VB02-Ubuntu-2004:~$ which python
alanjui@VB02-Ubuntu-2004:~$ which python3
/usr/bin/python3
alanjui@VB02-Ubuntu-2004:~$ python3
Python 3.8.5 (default, Jan 27 2021, 15:41:15)
[GCC 9.3.0] on linux
Type "help", "copyright", "credits" or "license" for more information.
>>>
alanjui@VB02-Ubuntu-2004:~$
2
3
4
5
6
7
8
9
10
11
12
13
14
15
16
17
18
19
20
21
📺 觀察作業系統預設的「安裝目錄路徑」:
alanjui@VB02-Ubuntu-2004:~$ ll /usr/bin/python*
lrwxrwxrwx 1 root root       9  3月 13  2020 /usr/bin/python2 -> python2.7*
-rwxr-xr-x 1 root root 3674216  3月  8 21:02 /usr/bin/python2.7*
lrwxrwxrwx 1 root root       9  3月 24 21:24 /usr/bin/python3 -> python3.8*
-rwxr-xr-x 1 root root 5486384  1月 27 23:41 /usr/bin/python3.8*
lrwxrwxrwx 1 root root      33  1月 27 23:41 /usr/bin/python3.8-config -> x86_64-linux-gnu-python3.8-config*
lrwxrwxrwx 1 root root      16  3月 13  2020 /usr/bin/python3-config -> python3.8-config*
2
3
4
5
6
7
- 需要使用套件管理器時,得手動安裝 pip3 。
sudo apt install python3-pip
上述指令執行後,使用者即可在作業系統以 pip3 指令,安裝 Python 套件。
pip3 install [Package_Name]
📺 若有需要可查詢 pip3 之版本編號,與其安裝目錄路徑:
alanjui@VB02-Ubuntu-2004:~$ pip3 --version
pip 21.0.1 from /usr/local/lib/python3.8/dist-packages/pip (python 3.8)
2
- 更新 pip3 至最新版本。
pip3 install --upgrade pip
【注意】: 指令最後是 pip ;而非 pip3 。自更新到最新版後,往後使用 pip 這個 Python 套件管理器,可以改成 pip ;不一定要特別標示為 Python 3.x 版本之 pip3 。
📺 pip3 完成更新後,將衍生出 pip ;且 pip3 與 pip 為同一版本。
alanjui@VB02-Ubuntu-2004:~$ ll /usr/local/lib/python3.8/dist-packages/
總用量 52
drwxrwsr-x 10 root staff  4096  4月  3 01:37 ./
drwxrwsr-x  3 root staff  4096  4月 23  2020 ../
drwxr-sr-x  3 root staff  4096  3月 28 12:01 asgiref/
drwxr-sr-x  2 root staff  4096  3月 28 12:01 asgiref-3.3.1.dist-info/
drwxr-sr-x  5 root staff  4096  3月 30 20:55 pip/
drwxr-sr-x  2 root staff  4096  3月 30 20:55 pip-21.0.1.dist-info/
drwxr-sr-x  2 root staff  4096  4月  3 01:37 __pycache__/
drwxr-sr-x  5 root staff  4096  3月 28 12:01 sqlparse/
drwxr-sr-x  2 root staff  4096  3月 28 12:01 sqlparse-0.4.1.dist-info/
drwxr-sr-x  2 root staff  4096  4月  3 01:37 uWSGI-2.0.19.1.dist-info/
-rw-r--r--  1 root staff 10392  4月  3 01:37 uwsgidecorators.py

alanjui@VB02-Ubuntu-2004:~$ which pip3
/usr/local/bin/pip3

alanjui@VB02-Ubuntu-2004:~$ pip --version
pip 21.0.1 from /usr/local/lib/python3.8/dist-packages/pip (python 3.8)

alanjui@VB02-Ubuntu-2004:~$ pip3 --version
pip 21.0.1 from /usr/local/lib/python3.8/dist-packages/pip (python 3.8)
2
3
4
5
6
7
8
9
10
11
12
13
14
15
16
17
18
19
20
21
22
- sudo pip install 與 pip install 的不同。
sudo pip install [Package_Name] 會將 Python 套件安裝在如下目錄路徑:
- 套件檔: /usr/local/lib/python3.8/dies-package/[Package_Name]
- 執行檔: /usr/local/bin/[Package_Name]
pip install [Package_Name] 會將套件安裝在如下目錄路徑:
- 套件檔: ~/.local/lib/python3.8/dies-package/[Package_Name]
- 執行檔: ~/.local/bin/[Package_Name]
# 安裝版本管理器 pyenv
安裝 Python 版本管理器:pyenv。
- 執行安裝。
git clone https://github.com/pyenv/pyenv.git ~/.pyenv
git clone https://github.com/pyenv/pyenv-virtualenv.git ~/.pyenv/plugins/pyenv-virtualenv
2
- 設定 Shell 環境,執行 pyenv 所需「環境變數」。
vim ~/.bashrc
🔖 ~/.bashrc:
export PYENV_ROOT="$HOME/.pyenv"
export PATH="$PYENV_ROOT/bin:$PATH"
if command -v pyenv 1>/dev/null 2>&1; then
  eval "$(pyenv init -)"
  eval "$(pyenv virtualenv-init -)"
fi
2
3
4
5
6
- 重啟 Shell ,啟用 pyenv 。
source ~/.bashrc
- 查驗 pyenv 安裝路徑:
which pyenv
- 驗證 pyenv 已能運作。
pyenv versions
📺
alanjui@VB02-Ubuntu-2004:~$ which pyenv
/home/alanjui/.pyenv/bin/pyenv

alanjui@VB02-Ubuntu-2004:~$ pyenv versions
* system (set by /home/alanjui/.pyenv/version)
2
3
4
5
# 安裝指定版本 Python
透過 pyenv 指令,安裝指定版本之 Python 直譯器。
pyenv install [Version_No]
📺 安裝 Python v3.9.1
pyenv install 3.9.1
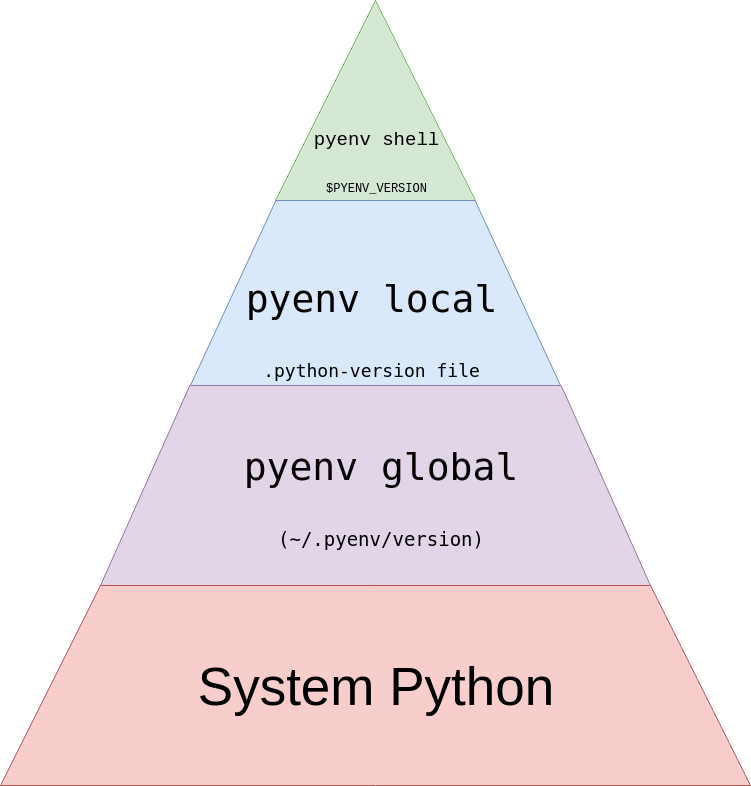
# 設定作業系統預設 Python
將某版本 Python 直譯器,設定成作業系統的「預設 Python 直譯器」。
- 使用 pyenv global 指令,指派作業系統層級之「預設 Python」。
pyenv global [Version_No]
- 使用 pyenv versions 指令,查詢「預設 Python」之版本編號。
pyenv versions
- 執行下列二指令,用以驗證「Python 直譯器所月嵬之版本編號」與「預設 Python」 所見「版本編號」一致。
pyenv versions
python
2
- 執行下列指令,用以驗證 Python [Version_No] 之一致性
pyenv --version
~/.pyenv/shims/python --version
~/.pyenv/versions/[Version_No]/bin/python --version
2
3
📺 指定「作業系統」的「預設」為 pyenv 的預設: pyenv
alanjui@VB02-Ubuntu-2004:~$ pyenv global system
alanjui@VB02-Ubuntu-2004:~$ pyenv versions
* system (set by /home/alanjui/.pyenv/version)
  3.8.5
  3.8.5/envs/mysite.ccc.tw.local
  3.9.1
  3.9.1/envs/venv-3.9.1
  mysite.ccc.tw.local
  venv-3.9.1
alanjui@VB02-Ubuntu-2004:~$ pyenv which python
pyenv: python: command not found

The `python' command exists in these Python versions:
  3.8.5
  3.8.5/envs/mysite.ccc.tw.local
  3.9.1
  3.9.1/envs/venv-3.9.1
  mysite.ccc.tw.local
  venv-3.9.1

Note: See 'pyenv help global' for tips on allowing both
      python2 and python3 to be found.

alanjui@VB02-Ubuntu-2004:~$ python3 -V
Python 3.8.5

alanjui@VB02-Ubuntu-2004:~$ echo $PATH
/home/alanjui/.pyenv/plugins/pyenv-virtualenv/shims:/home/alanjui/.pyenv/shims:/home/alanjui/.pyenv/bin:/home/alanjui/n/bin:/home/alanjui/.local/bin:/usr/local/sbin:/usr/local/bin:/usr/sbin:/usr/bin:/sbin:/bin:/usr/games:/usr/local/games:/snap/bin:/home/alanjui/n/bin

alanjui@VB02-Ubuntu-2004:~$ which python3
/home/alanjui/.pyenv/shims/python3

alanjui@VB02-Ubuntu-2004:~$ ~/.pyenv/shims/python3 -V
Python 3.8.5

alanjui@VB02-Ubuntu-2004:~$ pyenv which python3
/usr/bin/python3

alanjui@VB02-Ubuntu-2004:~$ /usr/bin/python3 -V
Python 3.8.5
2
3
4
5
6
7
8
9
10
11
12
13
14
15
16
17
18
19
20
21
22
23
24
25
26
27
28
29
30
31
32
33
34
35
36
37
38
39
40
📺 使用 pyenv which [Python_Package] ,可確認將執行的 Python 套件,來自那個 「目錄路徑」。
alanjui@VB02-Ubuntu-2004:~$ pyenv which pip3
/usr/local/bin/pip3

alanjui@VB02-Ubuntu-2004:~$ pyenv which pip
/usr/local/bin/pip

alanjui@VB02-Ubuntu-2004:~$ pyenv which uwsgi
/usr/local/bin/uwsgi
2
3
4
5
6
7
8
# 安裝 Vim 編輯器
安裝 Vim 編輯器。
# 安裝軟體
- 下載原始碼。
git clone https://github.com/vim/vim.git
- 編輯原始碼與安裝執行檔。
cd vim
./configure
sudo apt install ncurses-dev
make
sudo make install
2
3
4
5
# 設定作業環境
- 安裝 vim 作業設定檔
git clone https://github.com/AlanJui/vim8.git ~/.vim
- 安裝 Vim Plugins。
啟動 vim ,以便 vim 自動安裝 vim plugins 。
- 安裝 vim plugins 相依套件。
sudo apt install vifm
sudo apt install fzf
sudo apt install ripgrep
2
3
npm i -g bash-language-server
📺
alanjui@VB02-Ubuntu-2004:~$ npm i -g bash-language-server
npm WARN deprecated request@2.88.2: request has been deprecated, see https://github.com/request/request/issues/3142
npm WARN deprecated request-promise-native@1.0.9: request-promise-native has been deprecated because it extends the now deprecated request package, see https://github.com/request/request/issues/3142
npm WARN deprecated har-validator@5.1.5: this library is no longer supported
npm WARN deprecated left-pad@1.3.0: use String.prototype.padStart()
/home/alanjui/n/bin/bash-language-server -> /home/alanjui/n/lib/node_modules/bash-language-server/bin/main.js
+ bash-language-server@1.17.0
added 115 packages from 220 contributors in 9.368s
2
3
4
5
6
7
8
# 建置 Django App 開發作業環境
說明如何建置可供開發 Django App 之作業環境。
# 建置 Django App 專案
- 建置 Django App 專案目錄
cd ~/workspace/django
mkdir mysite && cd $_
2
- 建置及啟用虛擬環境。
- 確認作業系統中,已安裝之 Python 有那些版本?
pyenv versions
- 套用 Python 3.9.1 ,建置名稱為 venv-3.9.1 之「虛擬環境」。
pyenv virtualenv 3.9.1 venv-3.9.1
- 啟動 pyenv-virtualenv「依設定自動啟用虛擬環境」功能
pyenv local venv-3.9.1
- 安裝 Django 套件。
- 更新 pip 到最新版
pip install --upgrade pip
或 ⋯⋯
~/.pyenv/versions/3.9.1/envs/venv-3.9.1/bin/python3.9 -m pip install --upgrade pip
- 安裝 Django 套件
pip install Django
- 確認 Django 套件版本編號
python -m django --version
📺
(venv-3.9.1) alanjui@VB02-Ubuntu-2004:~/workspace/django/mysite$ python -m pip install Django
Collecting Django
  Using cached Django-3.1.7-py3-none-any.whl (7.8 MB)
Collecting pytz
  Using cached pytz-2021.1-py2.py3-none-any.whl (510 kB)
Collecting asgiref<4,>=3.2.10
  Using cached asgiref-3.3.1-py3-none-any.whl (19 kB)
Collecting sqlparse>=0.2.2
  Using cached sqlparse-0.4.1-py3-none-any.whl (42 kB)
Installing collected packages: sqlparse, pytz, asgiref, Django
Successfully installed Django-3.1.7 asgiref-3.3.1 pytz-2021.1 sqlparse-0.4.1

(venv-3.9.1) alanjui@VB02-Ubuntu-2004:~/workspace/django/mysite$ python -m django --version
3.1.7
2
3
4
5
6
7
8
9
10
11
12
13
14
- 建置 Django App 專案。
django-admin startproject app_config .
📺
(venv-3.9.1) alanjui@VB02-Ubuntu-2004:~/workspace/django/mysite$ django-admin startproject app_config .

(venv-3.9.1) alanjui@VB02-Ubuntu-2004:~/workspace/django/mysite$ ll
總用量 20
drwxrwxr-x 3 alanjui alanjui 4096  4月  1 14:08 ./
drwxrwxr-x 3 alanjui alanjui 4096  4月  1 13:16 ../
drwxrwxr-x 2 alanjui alanjui 4096  4月  1 14:08 app_config/
-rwxrwxr-x 1 alanjui alanjui  666  4月  1 14:08 manage.py*
-rw-rw-r-- 1 alanjui alanjui   11  4月  1 13:59 .python-version

(venv-3.9.1) alanjui@VB02-Ubuntu-2004:~/workspace/django/mysite$ tree .
.
├── app_config
│   ├── asgi.py
│   ├── __init__.py
│   ├── settings.py
│   ├── urls.py
│   └── wsgi.py
└── manage.py

1 directory, 6 files
2
3
4
5
6
7
8
9
10
11
12
13
14
15
16
17
18
19
20
21
- 設定 Django App 能使用之 Domain Name 或 IP 。
vim app_config/settings.py
🔖
ALLOWED_HOSTS = [
    'mysite.ccc.tw.local',
    '192.168.66.220',
    'localhost',
    '127.0.0.1',
]
2
3
4
5
6
- 驗證 Django App 已能運作。
- 啟用 Django App
python manage.py runserver 0.0.0.0:8000
使用「瀏覽器」觀察以下網址,若能看到如下畫面,即表通過驗證。
- http://192.168.66.220:8000/
- http://mysite.ccc.tw.local:8000/

# 安裝 uWSGI (WSGI 介面)
WSGI: Web Server Gateway Interface ,為 HTTP Server 與 Application Server 串接 之介面。在此指引,Application Server 即代表 Django App 應用系統。
以下說明,如何安裝 uwsgi 套件。在安裝結束後,進行一個簡單的測試,用以驗證 uwsgi 能與 Python 程式串接。此 Python 測試程式,扮演「偽 Application Server」(或稱: 假 Django App)。這個測試可用以驗證 uwsgi 的安裝正確;另外亦能用於證明 uwsgi 可 用於串接 Python 程式碼。
- 安裝 python 套件:uwsgi
pip install uwsgi
📺
(venv-3.9.1) alanjui@VB02-Ubuntu-2004:~/workspace/django/mysite$ pip install uwsgi
    Collecting uwsgi
Using cached uWSGI-2.0.19.1.tar.gz (803 kB)
    Using legacy 'setup.py install' for uwsgi, since package 'wheel' is not installed.
    Installing collected packages: uwsgi
2
3
4
5
- 建立測試原始碼: wsgi_test.py 。
# wsgi_test.py

def application(env, start_response):
start_response('200 OK', [('Content-Type','text/html')])
return [b"Hello World"] # python3
2
3
4
5
- 啟動 WSGI 介面程式,要求 uwsgi 監聽 Port: 9000 ,將收到之 HTTP Request,依據 --wsgi-file 參數之設定,轉交「偽 Application Server (假 Django App)」 處理。
通信路徑: Web Client ⬅➡ uWSGI (Port: 9000) ⬅➡ Django App(Fake)
uwsgi --http :9000 --wsgi-file wsgi_test.py
- 啟動「瀏覽器」觀察網址: http://mysite.ccc.tw.local:9000/ 。若在「網頁」看到 Hello World 即代表測試通過。
📺
(venv-3.9.1) alanjui@VB02-Ubuntu-2004:~/workspace/django/mysite$ uwsgi --http :9000 --wsgi-file wsgi_test.py
*** Starting uWSGI 2.0.19.1 (64bit) on [Thu Apr  1 15:19:16 2021] ***
compiled with version: 9.3.0 on 01 April 2021 07:04:38
os: Linux-5.8.0-48-generic #54~20.04.1-Ubuntu SMP Sat Mar 20 13:40:25 UTC 2021
nodename: VB02-Ubuntu-2004
machine: x86_64
clock source: unix
detected number of CPU cores: 2
current working directory: /home/alanjui/workspace/django/mysite
detected binary path: /home/alanjui/.pyenv/versions/3.9.1/envs/venv-3.9.1/bin/uwsgi
!!! no internal routing support, rebuild with pcre support !!!
*** WARNING: you are running uWSGI without its master process manager ***
your processes number limit is 15511
your memory page size is 4096 bytes
detected max file descriptor number: 1024
lock engine: pthread robust mutexes
thunder lock: disabled (you can enable it with --thunder-lock)
uWSGI http bound on :9000 fd 4
spawned uWSGI http 1 (pid: 22278)
uwsgi socket 0 bound to TCP address 127.0.0.1:37807 (port auto-assigned) fd 3
Python version: 3.9.1 (default, Mar 26 2021, 13:50:53)  [GCC 9.3.0]
*** Python threads support is disabled. You can enable it with --enable-threads ***
Python main interpreter initialized at 0x55f5d0d131e0
your server socket listen backlog is limited to 100 connections
your mercy for graceful operations on workers is 60 seconds
mapped 72920 bytes (71 KB) for 1 cores
*** Operational MODE: single process ***
WSGI app 0 (mountpoint='') ready in 0 seconds on interpreter 0x55f5d0d131e0 pid: 22236 (default app)
*** uWSGI is running in multiple interpreter mode ***
spawned uWSGI worker 1 (and the only) (pid: 22236, cores: 1)
[pid: 22236|app: 0|req: 1/1] 192.168.66.21 () {38 vars in 725 bytes} [Thu Apr  1 15:19:45 2021] GET / => generated 11 bytes in 0 msecs (HTTP/1.1 200) 1 headers in 44 bytes (1 switches on core 0)
[pid: 22236|app: 0|req: 2/2] 192.168.66.21 () {38 vars in 689 bytes} [Thu Apr  1 15:19:45 2021] GET /favicon.ico => generated 11 bytes in 0 msecs (HTTP/1.1 200) 1 headers in 44 bytes (1 switches on core 0)
^C(venv-3.9.1) alanjui@VB02-Ubuntu-2004:~/workspace/django/mysite$
2
3
4
5
6
7
8
9
10
11
12
13
14
15
16
17
18
19
20
21
22
23
24
25
26
27
28
29
30
31
32
33
# 驗證 uwsgi 可串接 Django
要求 uwsgi 監聽 Port: 8001 ,將收到之 HTTP Request ,依據 --module 參數之設定 ,將 Port: 8001 所收到之 HTTP Request 轉交 Django App 處理。
通信路徑: Web Client ⬅➡ uWSGI (Port: 8001) ⬅➡ Django App
- 啟動 uwsgi 介面程式。
uwsgi --http :8001 --module app_config.wsgi
📺
(mysite.ccc.tw.local) alanjui@VB02-Ubuntu-2004:~/workspace/django/mysite$ uwsgi --http :8001 --module app_config.wsgi
*** Starting uWSGI 2.0.19.1 (64bit) on [Mon Apr  5 10:31:55 2021] ***
compiled with version: 9.3.0 on 02 April 2021 17:30:08
os: Linux-5.8.0-48-generic #54~20.04.1-Ubuntu SMP Sat Mar 20 13:40:25 UTC 2021
nodename: VB02-Ubuntu-2004
machine: x86_64
clock source: unix
pcre jit disabled
detected number of CPU cores: 2
current working directory: /home/alanjui/workspace/django/mysite
detected binary path: /home/alanjui/.pyenv/versions/3.8.5/envs/mysite.ccc.tw.local/bin/uwsgi
*** WARNING: you are running uWSGI without its master process manager ***
your processes number limit is 15511
your memory page size is 4096 bytes
detected max file descriptor number: 1024
lock engine: pthread robust mutexes
thunder lock: disabled (you can enable it with --thunder-lock)
uWSGI http bound on :8001 fd 4
spawned uWSGI http 1 (pid: 7888)
uwsgi socket 0 bound to TCP address 127.0.0.1:33437 (port auto-assigned) fd 3
Python version: 3.8.5 (default, Apr  3 2021, 00:06:18)  [GCC 9.3.0]
*** Python threads support is disabled. You can enable it with --enable-threads ***
Python main interpreter initialized at 0x558a67952e20
your server socket listen backlog is limited to 100 connections
your mercy for graceful operations on workers is 60 seconds
mapped 72920 bytes (71 KB) for 1 cores
*** Operational MODE: single process ***
WSGI app 0 (mountpoint='') ready in 0 seconds on interpreter 0x558a67952e20 pid: 7846 (default app)
*** uWSGI is running in multiple interpreter mode ***
spawned uWSGI worker 1 (and the only) (pid: 7846, cores: 1)
[pid: 7846|app: 0|req: 1/1] 192.168.66.21 () {38 vars in 726 bytes} [Mon Apr  5 02:32:12 2021] GET / => generated 16351 bytes in 18 msecs (HTTP/1.1 200) 5 headers in 153 bytes (1 switches on core 0)
Not Found: /static/admin/css/fonts.css
[pid: 7846|app: 0|req: 2/2] 192.168.66.21 () {38 vars in 674 bytes} [Mon Apr  5 02:32:13 2021] GET /static/admin/css/fonts.css => generated 2031 bytes in 13 msecs (HTTP/1.1 404) 5 headers in 159 bytes (1 switches on core 0)
Not Found: /favicon.ico
[pid: 7846|app: 0|req: 3/3] 192.168.66.21 () {38 vars in 690 bytes} [Mon Apr  5 02:32:13 2021] GET /favicon.ico => generated 1986 bytes in 4 msecs (HTTP/1.1 404) 5 headers in 159 bytes (1 switches on core 0)
^C(mysite.ccc.tw.local) alanjui@VB02-Ubuntu-2004:~/workspace/django/mysite$
2
3
4
5
6
7
8
9
10
11
12
13
14
15
16
17
18
19
20
21
22
23
24
25
26
27
28
29
30
31
32
33
34
35
36
- 啟動「瀏覽器」觀察網址: http://mysite.ccc.tw.local:8001/ 。若能在「網頁」看到 如下畫面,即表測試通過。
# 安裝 Nginx (HTTP Server)
安裝 nginx 作為 HTTP Server。
- 安裝 nginx 套件。
sudo apt install nginx -y
- 驗證 nginx 服務已啟動。
- 驗證服務已啟用,且能隨作業系統開機自動啟動
systemctl status nginx
📺
alanjui@VB02-Ubuntu-2004:~$ systemctl status nginx
● nginx.service - A high performance web server and a reverse proxy server
Loaded: loaded (/lib/systemd/system/nginx.service; enabled; vendor preset: enabled)
Active: active (running) since Fri 2021-03-26 14:30:00 CST; 1min 10s ago
Docs: man:nginx(8)
Main PID: 67493 (nginx)
Tasks: 3 (limit: 4653)
Memory: 4.8M
CGroup: /system.slice/nginx.service
├─67493 nginx: master process /usr/sbin/nginx -g daemon on; master_process on;
├─67494 nginx: worker process
└─67495 nginx: worker process

3 月 26 14:30:00 VB02-Ubuntu-2004 systemd[1]: Starting A high performance web server and a reverse proxy ser>
3 月 26 14:30:00 VB02-Ubuntu-2004 systemd[1]: Started A high performance web server and a reverse proxy serv>
lines 1-14/14 (END)
2
3
4
5
6
7
8
9
10
11
12
13
14
15
16
- 驗證 nginx 的 HTTP Server 已能正常運作
使用 Web 瀏覽器,瀏覽如下網址,若能正常閱讀「網頁」內容,則表 HTTP Server 已能 正常運作。
http://[IP_Address]

# 設定 Nginx + uWSGI 作業環境
# 建置 Nginx 虛擬網站
- 套用 defaut 虛擬網站設定檔,建置 Django App 虛擬網站。
cd ~/workspace/django/mysite
cp /etc/nginx/sites-available/default config/mysite.ccc.tw.local.conf
2
- 設定 Django App 的「Nginx 虛擬網站」作業環境。
- 監聽 Port:8001
Nginx 依據「虛擬網站設定」,處理接收到之 HTTP Request ,對於無法處理之 Request , 則依據「設定檔中最後一條處理規則:uwsgi_pass」,轉交 upstream django { ... } 其中 的設定處理。
也就是 Nginx 虛擬網站,對於無法處理的 HTTP Request ,將透過 Port: 8001 轉交 WSGI 介面的程式 uwsgi 。uwsgi 這個介面程式,將把收到的 HTTP Request ,再次轉傳給最終的 Django App 進行處理。
vim config/mysite.ccc.tw.local.conf
🔖 mysite.ccc.tw.local.conf
upstream django {
    # for a web port socket
    server 127.0.0.1:8001;
}

server {
    # the port mysite will be served on
    listen 80;

    server_name mysite.ccc.tw.local;

    root /home/alanjui/worksapce/django/mysite;

    # Finally, send all non-static, non-media requests to the Django App server.
    location / {
        uwsgi_pass  django;
        include     /etc/nginx/uwsgi_params;
    }
}
2
3
4
5
6
7
8
9
10
11
12
13
14
15
16
17
18
19
- 停用 Default 虛擬網站
sudo unlink /etc/nginx/sites-enabled/default
- 啟用 Django App 虛擬網站
sudo ln -nfs ~/workspace/django/mysite/config/mysite.ccc.tw.local.conf /etc/nginx/sites-enabled
- 檢驗虛擬網站的設定,正確無誤。
sudo nginx -t
📺 驗證失敗
(venv-3.9.1) alanjui@VB02-Ubuntu-2004:~/workspace/django/mysite/config\$ sudo nginx -t
nginx: [emerg] unexpected "}" in /etc/nginx/sites-enabled/mysite.ccc.tw.local.conf:81
nginx: configuration file /etc/nginx/nginx.conf test failed
2
3
📺 驗證通過
(venv-3.9.1) alanjui@VB02-Ubuntu-2004:~/workspace/django/mysite/config\$ sudo nginx -t
nginx: the configuration file /etc/nginx/nginx.conf syntax is ok
nginx: configuration file /etc/nginx/nginx.conf test is successful
2
3
- 重啟 nginx 服務。
sudo sytemctl restart nginx
systemctl status nginx
2
- 啟動 WSGI 介面程式,要求 uwsgi 監聽 Port: 8001 ,然後透過 --module 參數的設定 ,將 Port: 8001 收到的 HTTP Request 轉交 Django App 處理。
通信路徑: Web Client ⬅➡ Web Server (Nginx) ⬅➡ uWSGI (Port: 8001) ⬅➡ Django App
uwsgi --socket :8001 --module app_config.wsgi
📺
(venv-3.9.1) alanjui@VB02-Ubuntu-2004:~/workspace/django/mysite$ uwsgi --http :8001 --module app_config.wsgi
*** Starting uWSGI 2.0.19.1 (64bit) on [Fri Apr  2 10:42:19 2021] ***
compiled with version: 9.3.0 on 01 April 2021 07:04:38
os: Linux-5.8.0-48-generic #54~20.04.1-Ubuntu SMP Sat Mar 20 13:40:25 UTC 2021
nodename: VB02-Ubuntu-2004
machine: x86_64
clock source: unix
detected number of CPU cores: 2
current working directory: /home/alanjui/workspace/django/mysite
detected binary path: /home/alanjui/.pyenv/versions/3.9.1/envs/venv-3.9.1/bin/uwsgi
!!! no internal routing support, rebuild with pcre support !!!
*** WARNING: you are running uWSGI without its master process manager ***
your processes number limit is 15511
your memory page size is 4096 bytes
detected max file descriptor number: 1024
lock engine: pthread robust mutexes
thunder lock: disabled (you can enable it with --thunder-lock)
uWSGI http bound on :8001 fd 4
spawned uWSGI http 1 (pid: 28180)
uwsgi socket 0 bound to TCP address 127.0.0.1:43009 (port auto-assigned) fd 3
Python version: 3.9.1 (default, Mar 26 2021, 13:50:53)  [GCC 9.3.0]
*** Python threads support is disabled. You can enable it with --enable-threads ***
Python main interpreter initialized at 0x55e0c9c181d0
your server socket listen backlog is limited to 100 connections
your mercy for graceful operations on workers is 60 seconds
mapped 72920 bytes (71 KB) for 1 cores
*** Operational MODE: single process ***
WSGI app 0 (mountpoint='') ready in 0 seconds on interpreter 0x55e0c9c181d0 pid: 28138 (default app)
*** uWSGI is running in multiple interpreter mode ***
spawned uWSGI worker 1 (and the only) (pid: 28138, cores: 1)
[pid: 28138|app: 0|req: 1/1] 192.168.66.21 () {40 vars in 750 bytes} [Fri Apr  2 02:42:40 2021] GET / => generated 16351 bytes in 11 msecs (HTTP/1.1 200) 5 headers in 153 bytes (1 switches on core 0)
Not Found: /static/admin/css/fonts.css
[pid: 28138|app: 0|req: 2/2] 192.168.66.21 () {40 vars in 728 bytes} [Fri Apr  2 02:42:40 2021] GET /static/admin/css/fonts.css => generated 2031 bytes in 5 msecs (HTTP/1.1 404) 5 headers in 159 bytes (1 switches on core 0)
Not Found: /favicon.ico
[pid: 28138|app: 0|req: 3/3] 192.168.66.21 () {38 vars in 690 bytes} [Fri Apr  2 02:42:44 2021] GET /favicon.ico => generated 1986 bytes in 6 msecs (HTTP/1.1 404) 5 headers in 159 bytes (1 switches on core 0)
^C(venv-3.9.1) alanjui@VB02-Ubuntu-2004:~/workspace/django/mysite$
2
3
4
5
6
7
8
9
10
11
12
13
14
15
16
17
18
19
20
21
22
23
24
25
26
27
28
29
30
31
32
33
34
35
36
- 驗證 Django App 虛擬網站的 HTTP 服務已能正常運作。
使用 Web 瀏覽器,瀏覽網址: http://mysite.ccc.tw.local/ 。若一切正常,應能於瀏覽器 看到如下「內容」之網頁。
# 驗證 Django App 已能整合運作
- 變更 socket 串連方式為 uninx socket 。
令 Nginx 虛擬網站與 uwsgi 介面程式的串接,自原來的 uwsgi 監聽 Port: 8001 ,改為: 監聽 uninx socket 檔案。
vim config/mysite.ccc.tw.local.conf
🔖 mysite.ccc.tw.local.conf
upstream django {
    # for a web port socket
    # server 127.0.0.1:8001;

    # for a file socket
    # server unix:///path/to/your/mysite/mysite.sock;
    # server unix:///home/alanjui/worksapce/django/mysite/run/mysite.ccc.tw.local.sock;
    server unix:///run/uwsgi/mysite.ccc.tw.local.sock;
}

server {
    # the port mysite will be served on
    listen 80;

    server_name mysite.ccc.tw.local;

    root /home/alanjui/worksapce/django/mysite;

    # Finally, send all non-static, non-media requests to the Django App server.
    location / {
        uwsgi_pass  django;
        include     /etc/nginx/uwsgi_params;
    }
}
2
3
4
5
6
7
8
9
10
11
12
13
14
15
16
17
18
19
20
21
22
23
24
- 備妥 unix socket 檔案,欲存放之「目錄」: /run/uwsgi/ 。
- 建立目錄
sudo mkdir -p /run/uwsgi
- 設定目錄及檔案的「擁有著」與「使用權限」
sudo chown -R www-data:www-data /run/uwsgi
sudo chmod -R 775 /run/uwsgi
2
- 重啟 nginx 服務。
sudo systemctl restart nginx
- 啟動 WSGI 介面。
通信路徑: Web Client ⬅➡ Web Server ⬅➡ Web Socket (Socket File) ⬅➡ uWSGI ⬅➡ Django App
uwsgi --socket /run/uwsgi/mysite.ccc.tw.local.sock --module app_config.wsgi --chmod-socket=666
📺
(mysite.ccc.tw.local) alanjui@VB02-Ubuntu-2004:~/workspace/django/mysite$ uwsgi --socket /run/uwsgi/mysite.ccc.tw.local.sock --module app_config.wsgi --chmod-socket=666
*** Starting uWSGI 2.0.19.1 (64bit) on [Mon Apr  5 11:59:53 2021] ***
compiled with version: 9.3.0 on 02 April 2021 17:30:08
os: Linux-5.8.0-48-generic #54~20.04.1-Ubuntu SMP Sat Mar 20 13:40:25 UTC 2021
nodename: VB02-Ubuntu-2004
machine: x86_64
clock source: unix
pcre jit disabled
detected number of CPU cores: 2
current working directory: /home/alanjui/workspace/django/mysite
detected binary path: /home/alanjui/.pyenv/versions/3.8.5/envs/mysite.ccc.tw.local/bin/uwsgi
*** WARNING: you are running uWSGI without its master process manager ***
your processes number limit is 15511
your memory page size is 4096 bytes
detected max file descriptor number: 1024
lock engine: pthread robust mutexes
thunder lock: disabled (you can enable it with --thunder-lock)
uwsgi socket 0 bound to UNIX address /run/uwsgi/mysite.ccc.tw.local.sock fd 3
Python version: 3.8.5 (default, Apr  3 2021, 00:06:18)  [GCC 9.3.0]
*** Python threads support is disabled. You can enable it with --enable-threads ***
Python main interpreter initialized at 0x563b16c43890
your server socket listen backlog is limited to 100 connections
your mercy for graceful operations on workers is 60 seconds
mapped 72920 bytes (71 KB) for 1 cores
*** Operational MODE: single process ***
WSGI app 0 (mountpoint='') ready in 0 seconds on interpreter 0x563b16c43890 pid: 11003 (default app)
*** uWSGI is running in multiple interpreter mode ***
spawned uWSGI worker 1 (and the only) (pid: 11003, cores: 1)
[pid: 11003|app: 0|req: 1/1] 192.168.66.21 () {42 vars in 797 bytes} [Mon Apr  5 04:00:25 2021] GET / => generated 16351 bytes in 11 msecs (HTTP/1.1 200) 5 headers in 153 bytes (1 switches on core 0)
Not Found: /favicon.ico
[pid: 11003|app: 0|req: 2/2] 192.168.66.21 () {42 vars in 756 bytes} [Mon Apr  5 04:00:25 2021] GET /favicon.ico => generated 1981 bytes in 8 msecs (HTTP/1.1 404) 5 headers in 159 bytes (1 switches on core 0)
^C(mysite.ccc.tw.local) alanjui@VB02-Ubuntu-2004:~/workspace/django/mysite$
2
3
4
5
6
7
8
9
10
11
12
13
14
15
16
17
18
19
20
21
22
23
24
25
26
27
28
29
30
31
32
- 啟動「瀏覽器」觀察網址: http://mysite.ccc.tw.local/ ,若能看到以下畫面, 即表通過測試。
# 啟用 Nginx 靜態檔的服務
啟用 Nginx 的「靜態檔」服務。當 HTTP Request 僅只是要求下載 static 或 media 類型 的檔案時,Nginx 服務將發揮扮演「HTTP Server」的角色,直接提供檔案下載的服務;但 若 HTTP Request 不是要求下載靜態檔時,Nginx 即透過 upstream 中的設定,將 HTTP Request 轉交予 uwsgi 介面程式,再由 uwsgi 交付給最終的 Django App 處理。
通信路徑: Web Client ⬅➡ Web Server ⬅➡ Web Socket (Socket File) ⬅➡ uWSGI ⬅➡ Django App
驗證 Web Client 傳來之 HTTP Request ,能被 uwsgi 服務接收,並轉傳至 Django App 。
- 建置「靜態檔案類型目錄」。
建立 static 及 media 靜態檔使用目錄。
cd ~/workspace/django/mysite
mkdir media
2
- 編輯 Django App 的設定檔
vim app_config/settings.py
- 設定 static_root ,令「靜態檔」集中匯入:專案目錄下的子目錄:static_files
🔖 settings.py
STATIC_URL = '/static/'
STATIC_ROOT = BASE_DIR / 'static_files'

MEDIA_URL = '/media/'
MEDIA_ROOT = BASE_DIR / 'media'
2
3
4
5
- 佈署 Django App 的「靜態檔案(static files)」。
匯集所有靜態檔案至「靜態檔佈署目錄」: /home/alanjui/workspace/django/mysite/static_files/
python manage.py collectstatic
- 佈署 Django App 的 Media 檔案
cp static_files/admin/img/search.svg media/
- 變更 Nginx 虛擬網站設定檔。
vim config/mysite.ccc.tw.local.conf
🔖 mysite.ccc.tw.local
upstream django {
    # server 127.0.0.1:8001;
    server unix:///run/uwsgi/mysite.ccc.tw.local.sock;
}

server {
    # listen 8000;
    listen 80;

    server_name mysite.ccc.tw.local;

    root /home/alanjui/workspace/django/mysite;
    # index index.html;
    charset utf-8;

    # max upload size
    client_max_body_size 75M; # adjust to taste

    # Django media
    location /media {
        alias /home/alanjui/workspace/django/mysite/media;
    }

    # Django static
    location /static {
        # alias /home/alanjui/workspace/django/mysite/static_collected;
        alias /home/alanjui/workspace/django/mysite/static_files;
    }

    # Finally, send all non-media requests to the Djang server.
    location / {
        # try_files $uri $uri/ =404;
        uwsgi_pass      django;
        include         /etc/nginx/uwsgi_params;
    }
}
2
3
4
5
6
7
8
9
10
11
12
13
14
15
16
17
18
19
20
21
22
23
24
25
26
27
28
29
30
31
32
33
34
35
36
- 驗證設定語法正確。
sudo nginx -t
- 重啟 Nginx 服務
sudo systemctl restart nginx
systemctl status nginx
2
- 啟動 uwsgi 介面程式。
uwsgi --socket ./run/mysite.ccc.tw.local.sock --module app_config.wsgi --chmod-socket=666
📚 若執行 uwsgi 時,不在「Django App 專案目錄」時(如:Shell 的現行目錄在 Home), 則可加入 chdir 選項,令 uwsgi 仍能正常執行。
cd

uwsgi --socket ~/workspace/django/mysite/run/mysite.ccc.tw.local.sock \
--chdir ~/workspace/django/mysite \
--module app_config.wsgi \
--chmod-socket=666
2
3
4
5
6
- 驗證能存取 static 靜態檔案
在 Web 瀏覽器,瀏覽網址: http://mysite.ccc.tw.local/static/admin/img/search.svg ,確認「網頁」能見到「放大鏡圖示」。
- 驗證能存取 media 靜態檔案
在 Web 瀏覽器,瀏覽網址: http://mysite.ccc.tw.local/media/search.svg ,確認「網頁」能見到「放大鏡圖示」。
- 驗證非存取 static 與 media 的 HTTP Request 會被送往 Django App ,使用者會 在「網頁」看到如下畫面。
- 清除測試後,遺留下的 unix socket 檔案。
ls -al /etc/uwsgi/
sudo rm -f /etc/uwsgi/mysite.ccc.tw.local.sock
2
# 使用 uwsgi 介面設定檔
為使 uwsgi 介面程式啟動的時候,可以更簡便些,不用輸入那麼多的「參數」。改善的 方法便是,設定 uwsgi 介面設定檔。
- 建置 uwsgi 服務設定檔
建置 uWSGI 介面設定檔: mysite_uwsgi.ini 。
cd /home/alanjui/worksapce/django/mysite
vim config/mysite_uwsgi.ini
2
🔖 uwsgi_mysite.ini
# uwsgi_mysite.ini
[uwsgi]
project = mysite
domain = %(project).ccc.tw.local
uid = www-data
gid = www-data
base = /home/alanjui/workspace/django/%(project)

# Django-related settings
# the base directory (full path)
#chdir = /home/alanjui/workspace/django/mysite
chdir = %(base)

# Django's wsgi file
module = app_config.wsgi

# the virtualenv (full path)
#home = /home/alanjui/worksapce/django/mysite/.venv
#home = %(chdir)/.venv
#home = /home/alanjui/.pyenv/versions/3.8.5/envs/mysite.ccctw.local
home = /home/alanjui/.pyenv/versions/$(domain)

# process-related settings
# master
master = true

# maximum number of worker processes
processes = 10

# the socket (use the full path to be safe
# socket = /run/uwsgi/%(project).sock
# socket = /home/alanjui/workspace/django/mysite/run/mysite.ccc.tw.local.sock
socket = /run/uwsgi/%(domain).sock

# ... with appropriate permissions - may be needed
#chmod-socket = 664
chmod-socket = 666

# clear environment on exit
vacuum = true
2
3
4
5
6
7
8
9
10
11
12
13
14
15
16
17
18
19
20
21
22
23
24
25
26
27
28
29
30
31
32
33
34
35
36
37
38
39
40
- 使用 uwsgi 介面設定檔,啟動 uwsgi 介面程式。
uwsgi --ini config/uwsgi_mysite.ini
📺
(mysite.ccc.tw.local) alanjui@VB02-Ubuntu-2004:~/workspace/django/mysite$ uwsgi --ini config/mysite_uwsgi.ini
[uWSGI] getting INI configuration from config/mysite_uwsgi.ini
*** Starting uWSGI 2.0.19.1 (64bit) on [Sat Apr  3 01:51:54 2021] ***
compiled with version: 9.3.0 on 02 April 2021 17:30:08
os: Linux-5.8.0-48-generic #54~20.04.1-Ubuntu SMP Sat Mar 20 13:40:25 UTC 2021
nodename: VB02-Ubuntu-2004
machine: x86_64
clock source: unix
pcre jit disabled
detected number of CPU cores: 2
current working directory: /home/alanjui/workspace/django/mysite
detected binary path: /home/alanjui/.pyenv/versions/3.8.5/envs/mysite.ccc.tw.local/bin/uwsgi
chdir() to /home/alanjui/workspace/django/mysite
your processes number limit is 15511
your memory page size is 409 bytes
detected max file descriptor number: 1024
lock engine: pthread robust mutexes
thunder lock: disabled (you can enable it with --thunder-lock)
uwsgi socket 0 bound to UNIX address /home/alanjui/workspace/django/mysite/run/mysite.ccc.tw.local.sock fd 3
Python version: 3.8.5 (default, Apr  3 2021, 00:06:18)  [GCC 9.3.0]
PEP 405 virtualenv detected: /home/alanjui/.pyenv/versions/mysite.ccc.tw.local
Set PythonHome to /home/alanjui/.pyenv/versions/mysite.ccc.tw.local
*** Python threads support is disabled. You can enable it with --enable-threads ***
Python main interpreter initialized at 0x5612b7a9bab0
your server socket listen backlog is limited to 100 connections
your mercy for graceful operations on workers is 60 seconds
mapped 802120 bytes (783 KB) for 10 cores
*** Operational MODE: preforking ***
WSGI app 0 (mountpoint='') ready in 0 seconds on interpreter 0x5612b7a9bab0 pid: 54009 (default app)
*** uWSGI is running in multiple interpreter mode ***
spawned uWSGI master process (pid: 54009)
spawned uWSGI worker 1 (pid: 54052, cores: 1)
spawned uWSGI worker 2 (pid: 54053, cores: 1)
spawned uWSGI worker 3 (pid: 54054, cores: 1)
spawned uWSGI worker 4 (pid: 54055, cores: 1)
spawned uWSGI worker 5 (pid: 54056, cores: 1)
spawned uWSGI worker 6 (pid: 54057, cores: 1)
spawned uWSGI worker 7 (pid: 54058, cores: 1)
spawned uWSGI worker 8 (pid: 54059, cores: 1)
spawned uWSGI worker 9 (pid: 54060, cores: 1)
spawned uWSGI worker 10 (pid: 54061, cores: 1)
[pid: 54058|app: 0|req: 1/1] 192.168.66.21 () {44 vars in 828 bytes} [Fri Apr  2 17:52:01 2021] GET / => generated 16351 bytes in 16 msecs (HTTP/1.1 200) 5 headers in 153 bytes (1 switches on core 0)
Not Found: /static/admin/css/fonts.css
[pid: 54058|app: 0|req: 2/2] 192.168.66.21 () {42 vars in 740 bytes} [Fri Apr  2 17:52:01 2021] GET /static/admin/css/fonts.css => generated 2026 bytes in 8 msecs (HTTP/1.1 404) 5 headers in 159 bytes (1 switches on core 0)
^CSIGINT/SIGQUIT received...killing workers...
worker 1 buried after 1 seconds
worker 2 buried after 1 seconds
worker 3 buried after 1 seconds
worker 4 buried after 1 seconds
worker 5 buried after 1 seconds
worker 6 buried after 1 seconds
worker 7 buried after 1 seconds
worker 8 buried after 1 seconds
worker 9 buried after 1 seconds
worker 10 buried after 1 seconds
goodbye to uWSGI.
VACUUM: unix socket /home/alanjui/workspace/django/mysite/run/mysite.ccc.tw.local.sock removed.
(mysite.ccc.tw.local) alanjui@VB02-Ubuntu-2004:~/workspace/django/mysite$6
2
3
4
5
6
7
8
9
10
11
12
13
14
15
16
17
18
19
20
21
22
23
24
25
26
27
28
29
30
31
32
33
34
35
36
37
38
39
40
41
42
43
44
45
46
47
48
49
50
51
52
53
54
55
56
57
58
- 驗證能存取 static 靜態檔案
在 Web 瀏覽器,瀏覽網址: http://mysite.ccc.tw.local/static/admin/img/search.svg ,確認「網頁」能見到「放大鏡圖示」。
- 驗證能存取 media 靜態檔案
在 Web 瀏覽器,瀏覽網址: http://mysite.ccc.tw.local/media/search.svg ,確認「網頁」能見到「放大鏡圖示」。
- 驗證非存取 static 與 media 的 HTTP Request 會被送往 Django App ,使用者會 在「網頁」看到如下畫面。
# 建置 uWSGI 服務
建置作業系統完成開機,便能自動啟動的 uWSGI 服務,以為 HTTP Server(Nginx Service) 引用的 WSGI (Web Server Gateway Interface) 。
📚 How to use Django with uWSGI (opens new window)
# 停用開發作業虛擬環境
停止使用 Django App 在「開發作業」使用的虛擬環境:mysite.ccc.tw.local。
cd
由於啟用 pyenv-virtualenv 及 pyenv local ,故而 Django App 專案,無法使用下列 指令,停用虛擬環境。
cd ~/workspace/django/mysite
pyenv deactivate
2
# 安裝作業系統用 uwsgi
- 安裝作業系統層級使用之 uWSGI 套件。
- Install current stable version
sudo /usr/bin/python3.8 -m pip instal uwsgi
- Install LTS (Long Term Support)
sudo /usr/bin/python3.8 -m pip install https://projects.unbit.it/downloads/uwsgi-lts.tar.gz
- 使用 pip 指令,驗證作業系統已安裝:uwsgi ,這個 Python 套件。
/usr/bin/python3.8 -m pip list
📺
alanjui@VB02-Ubuntu-2004:~$ /usr/bin/python3.8 -m pip list
[sudo] alanjui 的密碼:
Package                Version
---------------------- --------------------
apturl                 0.5.2
asgiref                3.3.1
astroid                2.4.2
blinker                1.4
Brlapi                 0.7.0
certifi                2019.11.28
chardet                3.0.4
Click                  7.0
colorama               0.4.3
....
ssh-import-id          5.10
systemd-python         234
ubuntu-advantage-tools 20.3
ubuntu-drivers-common  0.0.0
ufw                    0.36
unattended-upgrades    0.1
urllib3                1.25.8
uWSGI                  2.0.19.1
wadllib                1.3.3
wheel                  0.34.2
wrapt                  1.12.1
xkit                   0.0.0
2
3
4
5
6
7
8
9
10
11
12
13
14
15
16
17
18
19
20
21
22
23
24
25
26
- 透過「安裝目錄路徑」,驗證 uwsgi 已安裝。
ll /usr/local/lib/python3.8/dist-packages/
📺
alanjui@VB02-Ubuntu-2004:~$ ll /usr/local/lib/python3.8/dist-packages/
總用量 52
drwxrwsr-x 10 root staff  4096  4月  3 22:59 ./
drwxrwsr-x  3 root staff  4096  4月 23  2020 ../
drwxr-sr-x  3 root staff  4096  3月 28 12:01 asgiref/
drwxr-sr-x  2 root staff  4096  3月 28 12:01 asgiref-3.3.1.dist-info/
drwxr-sr-x  5 root staff  4096  3月 30 20:55 pip/
drwxr-sr-x  2 root staff  4096  3月 30 20:55 pip-21.0.1.dist-info/
drwxr-sr-x  2 root staff  4096  4月  3 22:59 __pycache__/
drwxr-sr-x  5 root staff  4096  3月 28 12:01 sqlparse/
drwxr-sr-x  2 root staff  4096  3月 28 12:01 sqlparse-0.4.1.dist-info/
drwxr-sr-x  2 root staff  4096  4月  3 22:59 uWSGI-2.0.19.1.dist-info/
-rw-r--r--  1 root staff 10392  4月  3 22:59 uwsgidecorators.py
2
3
4
5
6
7
8
9
10
11
12
13
# 建置及啟用 uWSGI 服務
- 建立 uwsgi 使用的 systemd 服務設定檔。
sudo vim /etc/systemd/system/uwsgi.service
🔖 uwsgi.service
[Unit]
Description=uWSGI Empermor Mode Service
After=syslog.target

[Service]
ExecStartPre=/bin/bash -c "mkdir -p /run/uwsgi; chown www-data:www-data /run/uwsgi"
ExecStart=/usr/local/bin/uwsgi --emperor /etc/uwsgi/apps-enabled --uid www-data --gid www-data
Restart=always
KillSignal=SIGQUIT
Type=notify
StandardError=syslog
NotifyAccess=all

[Install]
WantedBy=multi-user.target
2
3
4
5
6
7
8
9
10
11
12
13
14
15
- 啟用 uwsgi 的 systemd 服務。
sudo systemctl enable uwsgi
sudo systemctl start uwsgi
systemctl status uwsgi
2
3
# 啟用 Django App 服務
透過 uwsgi 服務,將 Django App 當成服務啟用。(意即:當作業系統完成開機後, Django App 即能操作使用。)
以 Emperor Mode 啟用 uWSGI 服務。
- 建置 Emperor Mode 服務用 vassals 目錄
sudo mkdir -p /etc/uwsgi/apps-available
sudo mkdir -p /etc/uwsgi/apps-enabled

sudo chown -R www-data:www-data /etc/uwsgi
sudo chmod -R 775 /etc/uwsgi
2
3
4
5
- 啟用服務設定
建立 uwsgi 服務設定檔的連結,放至目錄路徑中: /etc/uwsgi/apps-enabled/
sudo ln -nfs /home/alanjui/workspace/django/mysite/config/uwsgi_mysite.ini /etc/uwsgi/apps-available
- 以 Emper Mode 啟用 uwsgi 服務
sudo systemctl restart uwsgi
- 驗證能存取 static 靜態檔案
在 Web 瀏覽器,瀏覽網址: http://mysite.ccc.tw.local/static/admin/img/search.svg ,確認「網頁」能見到「放大鏡圖示」。
- 驗證能存取 media 靜態檔案
在 Web 瀏覽器,瀏覽網址: http://mysite.ccc.tw.local/media/search.svg ,確認「網頁」能見到「放大鏡圖示」。
- 驗證非存取 static 與 media 的 HTTP Request 會被送往 Django App
在 Web 瀏覽器,瀏覽網址: http://mysite.ccc.tw.local/ ,確認「網頁」能見到 如下圖之內容。
# 建置多種作業環境機制
為配合 uwsgi 服務之正常運作,Django App 宜有「多環境設定檔」,以便「開發作業」、 「測試(SIT)作業」、「試行(Staging)作業」與「上線(Production)作業」,各種 不同作業時期,都能自動切換應有的設定。
- 開發作業:dev.py
- 測試作業:test.py
- 試行作業:staging.py
- 上線作業:prod.py
# 設定多種作業環境
設定多種作業環境機制,需配合變更之檔案:
- manage.py
- wsgi.py
- urls.py
🔖 managy.py
#!/usr/bin/env python
import os
import sys

if **name** == "**main**":
os.environ.setdefault("DJANGO_SETTINGS_MODULE", "web_site.settings.prod")
try:
from django.core.management import execute_from_command_line
except ImportError as exc:
raise ImportError(
"Couldn't import Django. Are you sure it's installed and "
"available on your PYTHONPATH environment variable? Did you "
"forget to activate a virtual environment?"
) from exc
execute_from_command_line(sys.argv)
2
3
4
5
6
7
8
9
10
11
12
13
14
15
16
17
🔖 wsgi.py
"""
WSGI config for web_site project.

It exposes the WSGI callable as a module-level variable named `application`.

For more information on this file, see
https://docs.djangoproject.com/en/2.0/howto/deployment/wsgi/
"""

import os

from django.core.wsgi import get_wsgi_application

# os.environ.setdefault("DJANGO_SETTINGS_MODULE", "web_site.settings")

os.environ.setdefault('DJANGO_SETTINGS_MODULE', 'web_site.settings.prod')

application = get_wsgi_application()
2
3
4
5
6
7
8
9
10
11
12
13
14
15
16
17
18
19
20
🔖 urls.py
"""web_site URL Configuration

The `urlpatterns` list routes URLs to views. For more information please see:
https://docs.djangoproject.com/en/2.0/topics/http/urls/
Examples:
Function views

1. Add an import: from my_app import views
2. Add a URL to urlpatterns: path('', views.home, name='home')
   Class-based views
3. Add an import: from other_app.views import Home
4. Add a URL to urlpatterns: path('', Home.as_view(), name='home')
   Including another URLconf
5. Import the include() function: from django.urls import include, path
6. Add a URL to urlpatterns: path('blog/', include('blog.urls'))
   """
   from django.contrib import admin
   from django.urls import path, include

urlpatterns = [
path('admin/', admin.site.urls),
path('accounts/', include('accounts.urls')),
path('accounts/', include('django.contrib.auth.urls')),
path('books/', include('books.urls')),
path('posts/', include('posts.urls')),
path('', include('pages.urls')),
]
2
3
4
5
6
7
8
9
10
11
12
13
14
15
16
17
18
19
20
21
22
23
24
25
26
27
28
29
# 建置基礎作業環境
建置 Django App 基礎作業環境,以為其它各種作業環境 所引用的「基底」。
🔖 base.py
"""
Django settings for web_site project.

Generated by 'django-admin startproject' using Django 2.0.

For more information on this file, see
https://docs.djangoproject.com/en/2.0/topics/settings/

For the full list of settings and their values, see
https://docs.djangoproject.com/en/2.0/ref/settings/
"""

import os

# Build paths inside the project like this: os.path.join(BASE_DIR, ...)

BASE_DIR = os.path.dirname(os.path.dirname(os.path.abspath(**file**)))

# Quick-start development settings - unsuitable for production

# See https://docs.djangoproject.com/en/2.0/howto/deployment/checklist/

# SECURITY WARNING: keep the secret key used in production secret!

SECRET*KEY = '7g@&s!bkka+)w70=9=t2+%&r7um*!dg!7^5^yso%on@w&u&7g6'

# SECURITY WARNING: don't run with debug turned on in production!

# DEBUG= True

ALLOWED_HOSTS = [
'app.ccc.tw.local',
'localhost',
'127.0.0.1',
]

# Application definition

INSTALLED_APPS = [
'django.contrib.admin',
'django.contrib.auth',
'django.contrib.contenttypes',
'django.contrib.sessions',
'django.contrib.messages',
'whitenoise.runserver_nostatic',
'django.contrib.staticfiles',

    # Libs
    'crispy_forms',

    # My Apps
    'pages.apps.PagesConfig',
    'posts.apps.PostsConfig',
    'books.apps.BooksConfig',
    'accounts.apps.AccountsConfig',

]

MIDDLEWARE = [
'django.middleware.security.SecurityMiddleware',
'whitenoise.middleware.WhiteNoiseMiddleware',
'django.contrib.sessions.middleware.SessionMiddleware',
'django.middleware.common.CommonMiddleware',
'django.middleware.csrf.CsrfViewMiddleware',
'django.contrib.auth.middleware.AuthenticationMiddleware',
'django.contrib.messages.middleware.MessageMiddleware',
'django.middleware.clickjacking.XFrameOptionsMiddleware',

    # My MiddleWare

]

ROOT_URLCONF = 'web_site.urls'

TEMPLATES = [
{
'BACKEND': 'django.template.backends.django.DjangoTemplates',
'DIRS': [
os.path.join(BASE_DIR, 'templates'),
],
'APP_DIRS': True,
'OPTIONS': {
'context_processors': [
'django.template.context_processors.debug',
'django.template.context_processors.request',
'django.contrib.auth.context_processors.auth',
'django.contrib.messages.context_processors.messages',
],
},
},
]

WSGI_APPLICATION = 'web_site.wsgi.application'

# Database

# https://docs.djangoproject.com/en/2.0/ref/settings/#databases

DATABASES = {
'default': {
'ENGINE': 'django.db.backends.sqlite3',
'NAME': os.path.join(BASE_DIR, 'db.sqlite3'),
}
}

# Password validation

# https://docs.djangoproject.com/en/2.0/ref/settings/#auth-password-validators

AUTH_PASSWORD_VALIDATORS = [
{
'NAME': 'django.contrib.auth.password_validation.UserAttributeSimilarityValidator',
},
{
'NAME': 'django.contrib.auth.password_validation.MinimumLengthValidator',
},
{
'NAME': 'django.contrib.auth.password_validation.CommonPasswordValidator',
},
{
'NAME': 'django.contrib.auth.password_validation.NumericPasswordValidator',
},
]

# Internationalization

# https://docs.djangoproject.com/en/2.0/topics/i18n/

LANGUAGE_CODE = 'en-us'

TIME_ZONE = 'UTC'

USE_I18N = True

USE_L10N = True

USE_TZ = True

# Static files (CSS, JavaScript, Images)

# https://docs.djangoproject.com/en/2.0/howto/static-files/

STATIC_URL = '/static/'

# The absolute path to the directory where collectstatic will collect static files for deployment.

STATIC_ROOT = BASE_DIR / 'collectstatic'

# Simplified static file serving.

# https://warehouse.python.org/project/whitenoise/

# Document Ref: http://whitenoise.evans.io/en/stable/django.html

STATICFILES_STORAGEGE = 'whitenoise.storage.CompressedManifestStaticFilesStorage'

# Media Files

MEDIA_URL = '/media/'
MEDIA_ROOT = BASE_DIR / 'media')

# User Account Management

LOGIN_REDIRECT_URL = 'pages:home'
LOGOUT_REDIRECT_URL = 'pages:home'
AUTH_USER_MODEL = 'accounts.CustomUser'

# Form formatting

CRISPY_TEMPLATE_PACK = 'bootstrap4'
2
3
4
5
6
7
8
9
10
11
12
13
14
15
16
17
18
19
20
21
22
23
24
25
26
27
28
29
30
31
32
33
34
35
36
37
38
39
40
41
42
43
44
45
46
47
48
49
50
51
52
53
54
55
56
57
58
59
60
61
62
63
64
65
66
67
68
69
70
71
72
73
74
75
76
77
78
79
80
81
82
83
84
85
86
87
88
89
90
91
92
93
94
95
96
97
98
99
100
101
102
103
104
105
106
107
108
109
110
111
112
113
114
115
116
117
118
119
120
121
122
123
124
125
126
127
128
129
130
131
132
133
134
135
136
137
138
139
140
141
142
143
144
145
146
147
148
149
150
151
152
153
154
155
156
157
158
159
160
161
162
163
164
165
166
167
168
169
170
171
172
# 建置開發作業環境
🔖 dev.py
from .base import \*

# SECURITY WARNING: don't run with debug turned on in production!

DEBUG = True

# Quick-start development settings - unsuitable for production

# See https://docs.djangoproject.com/en/2.0/howto/deployment/checklist/

ALLOWED_HOSTS = [
'127.0.0.1',
'0.0.0.0',
]

# Database

# https://docs.djangoproject.com/en/2.0/ref/settings/#databases

if 'DATABASE_HOST' in os.environ:
DATABASES\['default'\]['HOST'] = os.getenv('DATABASE_HOST')
DATABASES\['default'\]['ENGINE'] = 'django.db.backends.postgresql_psycopg2'
DATABASES\['default'\]['NAME'] = os.getenv('DATABASE_NAME')
DATABASES\['default'\]['USER'] = os.getenv('DATABASE_USER')
DATABASES\['default'\]['PASSWORD'] = os.getenv('DATABASE_PASSWORD')

    DATABASES = {
        'default': {
            'ENGINE': 'django.db.backends.postgresql_psycopg2',
            'NAME': 'django2_helloworld_db',
            'USER': 'django2_helloworld',
            'PASSWORD': 'Passw0rd',
            'HOST': 'localhost',
            'PORT': '5432',
        }
    }

else:
DATABASES = {
'default': {
'ENGINE': 'django.db.backends.sqlite3',
'NAME': os.path.join(BASE_DIR, 'db.sqlite3'),
}
}

# Contact Us From

EMAIL_BACKEND = 'django.core.mail.backends.console.EmailBackend'

# BASE_URL required for notification emails

BASE_URL = 'http://localhost:8000'
2
3
4
5
6
7
8
9
10
11
12
13
14
15
16
17
18
19
20
21
22
23
24
25
26
27
28
29
30
31
32
33
34
35
36
37
38
39
40
41
42
43
44
45
46
47
48
49
50
51
52
53
54
# 建置測試作業環境
🔖 test.py
# 建置試行作業環境
🔖 staging.py
# from web_site.settings.base import \*

from .base import \*

# SECURITY WARNING: don't run with debug turned on in production!

DEBUG = False

ALLOWED_HOSTS = [
'127.0.0.1',
'192.168.66.10',
'localhost',
'app.ccc.tw.local',
]

DATABASES = {
'default': {
'ENGINE': 'django.db.backends.postgresql_psycopg2',
'NAME': 'django2_helloworld_db',
'USER': 'django2_helloworld',
'PASSWORD': 'Passw0rd',
'HOST': 'localhost',
'PORT': '5432',
}
}

DATABASE_URL = 'postgres://django2_helloworld:Passw0rd@localhost:5432/django2_hellowrold_db'
2
3
4
5
6
7
8
9
10
11
12
13
14
15
16
17
18
19
20
21
22
23
24
25
26
27
28
29
# 建置上線作業環境
🔖 prod.py
# from web_site.settings.base import \*

from .base import \*

# SECURITY WARNING: don't run with debug turned on in production!

DEBUG = False

ALLOWED_HOSTS = [
'127.0.0.1',
'192.168.66.10',
'localhost',
'app.ccc.tw',
]

DATABASES = {
'default': {
'ENGINE': 'django.db.backends.postgresql_psycopg2',
'NAME': 'django2_helloworld_db',
'USER': 'django2_helloworld',
'PASSWORD': 'Passw0rd',
'HOST': 'localhost',
'PORT': '5432',
}
}

DATABASE_URL = 'postgres://django2_helloworld:Passw0rd@localhost:5432/django2_hellowrold_db'
2
3
4
5
6
7
8
9
10
11
12
13
14
15
16
17
18
19
20
21
22
23
24
25
26
27
28
29
# 建置 Heroku 平台作業環境
🔖 heroku.py
# from web_site.settings.base import \*

from .base import \*
import django_heroku
import dj_database_url

# Set environment variables (SECRET_KEY and others)

EMAIL_HOST_USER = os.environ.get('EMAIL_HOST_USER')
EMAIL_HOST_PASSWORD = os.environ.get('EMAIL_HOST_PASSWORD')

# SECURITY WARNING: keep the secret key used in production secret!

# SECRET_KEY = 'CHANGE_ME!!!! (P.S. the SECRET_KEY environment variable will be used, if set, instead).'

# SECRET_KEY = os.environ.get('SECRET_KEY')

# SECURITY WARNING: don't run with debug turned on in production!

# DEBGUG = True

DEBUG = bool(os.environ.get('DJANGO_DEBUG', True))

# # Quick-start development settings - unsuitable for production

# # See https://docs.djangoproject.com/en/2.0/howto/deployment/checklist/

ALLOWED_HOSTS = [
'127.0.0.1',
'localhost',
'.herokuapp.com',
'serene-crag-30137.herokuapp.com',
]

# Database

# https://docs.djangoproject.com/en/2.0/ref/settings/#databases

# Heroku: Update database configuration from \$DATABASE_URL

db_from_env = dj_database_url.config(conn_max_age=500)
DATABASES['default'].update(db_from_env)

django_heroku.settings(locals())
2
3
4
5
6
7
8
9
10
11
12
13
14
15
16
17
18
19
20
21
22
23
24
25
26
27
28
29
30
31
32
33
34
35
36
37
38
39
40
41
42
43
44
45
46
# 問題診斷與狀況排除
# 解除作業系統預設之 vim
如下方式安裝之 VIM 套件,無法安裝「最新版」。
sudo apt install vim
2
3
若欲安裝最新版之 VIM ,可使用 GitHub 之原始碼建置。已安裝之 VIM ,可依以下方法, 解除原先安裝及清除設定。
sudo apt remove vim --purge
2
3
📺
alanjui@VB02-Ubuntu-2004:~\$ sudo apt remove vim --purge
正在讀取套件清單... 完成
正在重建相依關係
正在讀取狀態資料... 完成
以下套件為自動安裝,並且已經無用:
vim-runtime
使用 'sudo apt autoremove' 將之移除。
下列套件將會被【移除】:
vim\*
升級 0 個,新安裝 0 個,移除 1 個,有 0 個未被升級。
此操作完成之後,會空出 3,111 kB 的磁碟空間。
是否繼續進行 [Y/n]? [Y/n] y
(讀取資料庫 ... 目前共安裝了 171827 個檔案和目錄。)
正在移除 vim (2:8.1.2269-1ubuntu5)……
update-alternatives: 在自動模式下以 /usr/bin/vim.tiny 來提供 /usr/bin/vi (vi)
update-alternatives: 在自動模式下以 /usr/bin/vim.tiny 來提供 /usr/bin/view (view)
update-alternatives: 在自動模式下以 /usr/bin/vim.tiny 來提供 /usr/bin/ex (ex)
update-alternatives: 在自動模式下以 /usr/bin/vim.tiny 來提供 /usr/bin/rview (rview)
(讀取資料庫 ... 目前共安裝了 171818 個檔案和目錄。)
正在清除 vim (2:8.1.2269-1ubuntu5) 的設定檔……
2
3
4
5
6
7
8
9
10
11
12
13
14
15
16
17
18
19
20
21
22
# 常見操作
# 啟用「虛擬環境」
pyenv [Virtual_Env]
2
3
📺
alanjui@VB02-Ubuntu-2004:~/workspace/django/mysite$ pyenv shell venv39
(venv39) alanjui@VB02-Ubuntu-2004:~/workspace/django/mysite$
2
3
4
# 啟用與停止虛擬環境
pyenv active [Virtual_Env]
pyenv deactivate
2
3
4
📺
alanjui@VB02-Ubuntu-2004:~/workspace/django/mysite\$ pyenv activate venv-3.9.1
pyenv-virtualenv: prompt changing will be removed from future release. configure `export PYENV_VIRTUALENV_DISABLE_PROMPT=1' to simulate the behavior.

(venv-3.9.1) alanjui@VB02-Ubuntu-2004:~/workspace/django/mysite$ pyenv deactivate
alanjui@VB02-Ubuntu-2004:~/workspace/django/mysite$
2
3
4
5
6
7
# 建立虛擬環境
pyenv virtualenv [Version_No][virtual_env]
2
3
📺
alanjui@VB02-Ubuntu-2004:~\$ pyenv virtualenvs

alanjui@VB02-Ubuntu-2004:~\$ pyenv virtualenv 3.9.1 venv-3.9.1
Looking in links: /tmp/tmp6e0qe2zi
Requirement already satisfied: setuptools in /home/alanjui/.pyenv/versions/3.9.1/envs/venv-3.9.1/lib/python3.9/site-packages (49.2.1)
Requirement already satisfied: pip in /home/alanjui/.pyenv/versions/3.9.1/envs/venv-3.9.1/lib/python3.9/site-packages (20.2.3)

alanjui@VB02-Ubuntu-2004:~\$ pyenv virtualenvs
3.9.1/envs/venv-3.9.1 (created from /home/alanjui/.pyenv/versions/3.9.1)
venv-3.9.1 (created from /home/alanjui/.pyenv/versions/3.9.1)
2
3
4
5
6
7
8
9
10
11
12
# 套用目前的 Python 建立虛擬環境
pyenv virtualenv [Virtual_Env]
2
3
📺
alanjui@VB02-Ubuntu-2004:~/workspace/django/mysite\$ pyenv version
3.9.1 (set by /home/alanjui/.pyenv/version)

alanjui@VB02-Ubuntu-2004:~/workspace/django/mysite\$ pyenv virtualenv venv39
Looking in links: /tmp/tmp4fyfh4dr
Requirement already satisfied: setuptools in /home/alanjui/.pyenv/versions/3.9.1/envs/venv39/lib/python3.9/site-packages (49.2.1)
Requirement already satisfied: pip in /home/alanjui/.pyenv/versions/3.9.1/envs/venv39/lib/python3.9/site-packages (20.2.3)

alanjui@VB02-Ubuntu-2004:~/workspace/django/mysite\$ pyenv virtualenvs
3.9.1/envs/venv39 (created from /home/alanjui/.pyenv/versions/3.9.1)
3.9.1/envs/venv-3.9.1 (created from /home/alanjui/.pyenv/versions/3.9.1)
venv39 (created from /home/alanjui/.pyenv/versions/3.9.1)
venv-3.9.1 (created from /home/alanjui/.pyenv/versions/3.9.1)
2
3
4
5
6
7
8
9
10
11
12
13
14
15
# 查詢有那些虛擬環境
List existing virtualenvs:
pyenv virtualenvs
2
3
📺
alanjui@VB02-Ubuntu-2004:~/workspace/django/mysite\$ pyenv virtualenvs
3.9.1/envs/venv-3.9.1 (created from /home/alanjui/.pyenv/versions/3.9.1)
venv-3.9.1 (created from /home/alanjui/.pyenv/versions/3.9.1)
2
3
4
5
# 刪除已建立之虛擬環境
pyenv uninstall [Virtual_Env]
2
3
📺
alanjui@VB02-Ubuntu-2004:~/workspace/django/mysite$ pyenv uninstall venv39
pyenv-virtualenv: remove /home/alanjui/.pyenv/versions/3.9.1/envs/venv39? y
alanjui@VB02-Ubuntu-2004:~/workspace/django/mysite$

alanjui@VB02-Ubuntu-2004:~/workspace/django/mysite\$ pyenv virtualenvs
3.9.1/envs/venv-3.9.1 (created from /home/alanjui/.pyenv/versions/3.9.1)
venv-3.9.1 (created from /home/alanjui/.pyenv/versions/3.9.1)

alanjui@VB02-Ubuntu-2004:~/workspace/django/mysite\$ ll ~/.pyenv/versions
總用量 12
drwxrwxr-x 3 alanjui alanjui 4096 4 月 1 13:33 ./
drwxrwxr-x 14 alanjui alanjui 4096 3 月 26 20:45 ../
drwxr-xr-x 7 alanjui alanjui 4096 3 月 26 20:45 3.9.1/
lrwxrwxrwx 1 alanjui alanjui 51 3 月 26 20:45 venv-3.9.1 -> /home/alanjui/.pyenv/versions/3.9.1/envs/venv-3.9.1/
2
3
4
5
6
7
8
9
10
11
12
13
14
15
16
# 更新 pip 至最新版
python -m pip install --upgrade pip
2
3
/home/alanjui/.pyenv/versions/3.8.5/envs/mysite.ccc.tw.local/bin/python3.8 -m pip install --upgrade pip
2
3
📺
(mysite.ccc.tw.local) alanjui@VB02-Ubuntu-2004:~/workspace/django/mysite\$ pip list
Package Version

---

pip 20.1.1
setuptools 47.1.0
WARNING: You are using pip version 20.1.1; however, version 21.0.1 is available.
You should consider upgrading via the '/home/alanjui/.pyenv/versions/3.8.5/envs/mysite.ccc.tw.local/bin/python3.8 -m pip install --upgrade pip' command.

(mysite.ccc.tw.local) alanjui@VB02-Ubuntu-2004:~/workspace/django/mysite\$ /home/alanjui/.pyenv/versions/3.8.5/envs/mysite.ccc.tw.local/bin/python3.8 -m pip install --upgrade pip
Collecting pip
Using cached pip-21.0.1-py3-none-any.whl (1.5 MB)
Installing collected packages: pip
Attempting uninstall: pip
Found existing installation: pip 20.1.1
Uninstalling pip-20.1.1:
Successfully uninstalled pip-20.1.1
Successfully installed pip-21.0.1

(mysite.ccc.tw.local) alanjui@VB02-Ubuntu-2004:~/workspace/django/mysite\$ pip list
Package Version

---

pip 21.0.1
setuptools 47.1.0
2
3
4
5
6
7
8
9
10
11
12
13
14
15
16
17
18
19
20
21
22
23
24
25
26
27
28
29
# 問題診斷與狀況排除
# 執行 uwsgi 發生 run time error
!!! no internal routing support, rebuild with pcre support !!!
2
3
📺
(mysite.ccc.tw.local) alanjui@VB02-Ubuntu-2004:~/workspace/django/mysite\$ uwsgi --ini config/mysite\*uwsgi.ini
[uWSGI] getting INI configuration from config/mysite_uwsgi.ini
\*\*\* Starting uWSGI 2.0.19.1 (64bit) on [Sat Apr 3 01:14:22 2021] \_\*\*
compiled with version: 9.3.0 on 28 March 2021 03:24:44
os: Linux-5.8.0-48-generic #54~20.04.1-Ubuntu SMP Sat Mar 20 13:40:25 UTC 2021
nodename: VB02-Ubuntu-2004
machine: x86_64
clock source: unix
detected number of CPU cores: 2
current working directory: /home/alanjui/workspace/django/mysite
detected binary path: /home/alanjui/.pyenv/versions/3.8.5/envs/mysite.ccc.tw.local/bin/uwsgi
!!! no internal routing support, rebuild with pcre support !!!
chdir() to /home/alanjui/worksapce/django/mysite
chdir(): No such file or directory [core/uwsgi.c line 2625]
chdir(): No such file or directory [core/uwsgi.c line 1649]
2
3
4
5
6
7
8
9
10
11
12
13
14
15
16
17
🔨
# Uninstall uwsgi

pip uninstall uwsgi
sudo apt remove uwsgi

# install pcre libaries

sudo apt install libpcre3 libpcre3-dev

pip install uwsgi -I --no-cache-dir
2
3
4
5
6
7
8
9
10
11
12
📺
(mysite.ccc.tw.local) alanjui@VB02-Ubuntu-2004:~/workspace/django/mysite\$ pip install uwsgi -I --no-cache-dir
Collecting uwsgi
Downloading uWSGI-2.0.19.1.tar.gz (803 kB)
|████████████████████████████████| 803 kB 1.7 MB/s
Using legacy 'setup.py install' for uwsgi, since package 'wheel' is not installed.
Installing collected packages: uwsgi
Running setup.py install for uwsgi ... done
Successfully installed uwsgi-2.0.19.1
2
3
4
5
6
7
8
9
10
📺 使用 pip install uwsgi 安裝,pip 預設用 cache ,參考如下之安裝畫面,可見 Using cached uWSGI-2.0.19.1... 字樣。
(mysite.ccc.tw.local) alanjui@VB02-Ubuntu-2004:~/workspace/django/mysite\$ pip install uwsgi
Collecting uwsgi
Using cached uWSGI-2.0.19.1-cp38-cp38-linux_x86_64.whl
Installing collected packages: uwsgi
Successfully installed uwsgi-2.0.19.1
2
3
4
5
6
7
# 啟動 uwsgi ,發生 uninx socket 錯誤
啟動 uwsgi 介面時,使用 uwsgi 設定檔,無法正常執行,發生如下錯誤:
error removing unix socket, unlink(): Permission denied [core/socket.c line 198]
2
3
📺
(mysite.ccc.tw.local) alanjui@VB02-Ubuntu-2004:~/workspace/django/mysite\$ uwsgi --ini config/mysite\*uwsgi.ini
[uWSGI] getting INI configuration from config/mysite_uwsgi.ini
\*\*\* Starting uWSGI 2.0.19.1 (64bit) on [Sat Apr 3 11:39:31 2021] \_\*\*
compiled with version: 9.3.0 on 02 April 2021 17:30:08
os: Linux-5.8.0-48-generic #54~20.04.1-Ubuntu SMP Sat Mar 20 13:40:25 UTC 2021
nodename: VB02-Ubuntu-2004
machine: x86_64
clock source: unix
pcre jit disabled
detected number of CPU cores: 2
current working directory: /home/alanjui/workspace/django/mysite
detected binary path: /home/alanjui/.pyenv/versions/3.8.5/envs/mysite.ccc.tw.local/bin/uwsgi
chdir() to /home/alanjui/workspace/django/mysite
your processes number limit is 15511
your memory page size is 4096 bytes
detected max file descriptor number: 1024
lock engine: pthread robust mutexes
thunder lock: disabled (you can enable it with --thunder-lock)
error removing unix socket, unlink(): Permission denied [core/socket.c line 198]
bind(): Address already in use [core/socket.c line 230]
2
3
4
5
6
7
8
9
10
11
12
13
14
15
16
17
18
19
20
21
22
🔍 問題診斷:因為前次執行 uwsgi ,沒能讓 uwsgi 正常終止,致使「目錄」: /run/uwsgi/ 仍留下當時執行的 unix socket 檔: mysite.ccc.tw.local.sock 。
(mysite.ccc.tw.local) alanjui@VB02-Ubuntu-2004:~/workspace/django/mysite\$ ll /run/uwsgi/
總用量 0
drwxr-xr-x 2 www-data www-data 60 3 月 31 10:42 ./
drwxr-xr-x 34 root root 1020 4 月 3 11:28 ../
srw-rw-rw- 1 www-data www-data 0 3 月 31 10:42 mysite.ccc.tw.local.sock=
2
3
4
5
6
7
🔨 狀況排除:先刪除前次執行遺留下的 unix socket 檔,然後再啟動 uwsgi 。
(mysite.ccc.tw.local) alanjui@VB02-Ubuntu-2004:~/workspace/django/mysite\$ sudo rm /run/uwsgi/mysite.ccc.tw.local.sock
2
3
# 終止使用中的 Port
fuser -n tcp [Port_No]
2
3
📺
(venv-3.9.1) alanjui@VB02-Ubuntu-2004:~/workspace/django/mysite\$ python manage.py runserver 0.0.0.0:8000
Watching for file changes with StatReloader
Performing system checks...

System check identified no issues (0 silenced).

You have 18 unapplied migration(s). Your project may not work properly until you apply the migrations for app(s): admin, auth, contenttypes, sessions.
Run 'python manage.py migrate' to apply them.
April 01, 2021 - 07:26:08
Django version 3.1.7, using settings 'app_config.settings'
Starting development server at http://0.0.0.0:8000/
Quit the server with CONTROL-C.
Error: That port is already in use.

(venv-3.9.1) alanjui@VB02-Ubuntu-2004:~/workspace/django/mysite\$ fuser -n tcp -k 8000
2
3
4
5
6
7
8
9
10
11
12
13
14
15
16
17
# 資料參考
# pyenv-virtualenv 官網資料
pyenv-virtualenv (opens new window)